.jpg)
We can all think of a situation where an application became unresponsive due to insufficient resources for the load you’re currently receiving. A solution would be to manually add resources whenever such a situation occurs, but ain’t nobody got time for that. This is where autoscaling comes in. In this blog, I explain what (auto)scaling is and tell you more about the different ways you can use it, within Kubernetes.
What is scaling anyway?
Scaling can be divided into two categories, horizontal- and vertical scaling. Horizontal scaling refers to adding additional replicas or machines to distribute the load between them.
Vertical scaling on the other hand works by resizing the already existing infrastructure, like adding more CPU or memory to a server.


However, doing this manually is rather time-consuming, especially when the increased load only sustains for a short period of time. In other words, you’re always too late. This is where autoscaling comes in, by automatically scaling either horizontally or vertically when the current incoming load requires it.
What is autoscaling?
Autoscaling is a form of scaling where the decision to increase or decrease load is made automatically by software. In short, it adds resources when your application is busy and removes them when they’re not necessary anymore. As this load can continuously change during the day, manually scaling can become very inconvenient and inefficient.
Autoscaling in Kubernetes
Both horizontal- and vertical autoscaling are available within Kubernetes. Horizontal scaling is supported on both node- and pod level, while vertical scaling is only supported on the latter. Below, we'll dive into how Kubernetes incorporates. both techniques to achieve ultimate scalability.
Horizontal Pod Autoscaler
As the name suggests, using the Horizontal Pod Autoscaler (HPA) we can scale horizontally by adding additional replicas of a given pod.
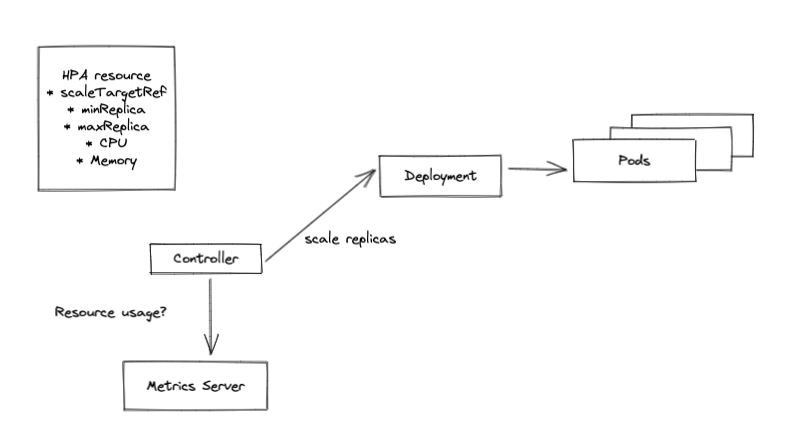
The HPA works with an API resource and a controller, which you link to a Deployment or StatefulSet using selector labels. Next, the HPA controller periodically compares (every 15 seconds by default) the HPA configuration with the pod's metrics. The most obvious metrics are CPU and memory usage.
For example, if you specify a maximum usage of 75% memory in the HPA, the HPA controller will add a pod as soon as the average usage of all pods within this replicaSet reaches 75% or more. An important factor here is that you have correctly configured the resource requests & limits for the pod.
In the event of missing metrics, the HPA controller assumes 100% of the desired measurement value in the case of a scale-down, and 0% in the case of a scale-up. Pod metrics are postponed until 300 seconds after the pod starts. This period can be reconfigured using the horizontal-pod-autoscaler-cpu-initialization-period flag.
In addition to CPU and memory usage, Kubernetes version 1.23 supports feeding the HPA with custom metrics, such as network activity or, for example, the length of an external queue. However, this is a rather primitive implementation and not as extensive of a solution as KEDA.sh which allows for more fine-grained control regarding your scaling requirements.
Vertical Pod Autoscaler
In addition to the HPA, there is also a VPA, also known as the Vertical Pod Autoscaler. Rather than increasing the number of replicas, it works based on increasing the pod's configured resources to the recommended value. This value is determined by the VPA recommender, depending on the mode it’s set to.
The VPA consists of three components
- Admission controller: Triggers when new pods are created and checks if it is covered by a VPA.
- Recommender: Provides advice based on historical and live resource usage metrics, which has a number of modes to base those recommendations on
- target: Standard advice that the VPA applies at the next execution. (set to a minute by default)
- lowerbound: The minimum viable advice which is not guaranteed to handle load spikes.
- upperbound: Wider advice, configuring higher than this probably leads to wasted resources
- uncappedTarget: Which requests should you configure if you don't specify any limits. Runs every minute and calculates if the pod is configured within the recommended range. If not, it replaces the pods with a new resource configuration
- Updater: Decides which pods should be restarted based on resources allocation recommendation calculated by the Recommender.
The updateMode of the VPA impacts its functionality, and can be configured in two ways:
- When setting the updateMode of your VPA object to Auto or Recreate, the recommended CPU and memory values are applied automatically. Keep in mind that this requires a restart/recreation of the pod!
- With updateMode set to Off, recommendations are still generated but not applied to the resource. These can then be used by you to reconfigure the resources to better reflect what the pod actually needs.
Advice is generated on live data and therefore does not depend on a benchmark in advance to determine the right resources. Thanks to the resource advice of the VPA, you waste less resources and you may be able to get by with fewer nodes; which results in major cost savings as cluster nodes are used more efficiently.
Limitations:
The VPA is unsuitable for Java-based applications, due to the limited insight into the actual memory usage as Java allocates most of the memory available when running, even when not using it “actively”.
Cluster autoscaler
Within Kubernetes, you can distinguish different types of scaling as well. Namely, one that adds or removes replicas of the application in question and another that resizes the cluster itself. The cluster autoscaler is responsible for the latter, which repeatedly checks if the cluster meets one of the following conditions:
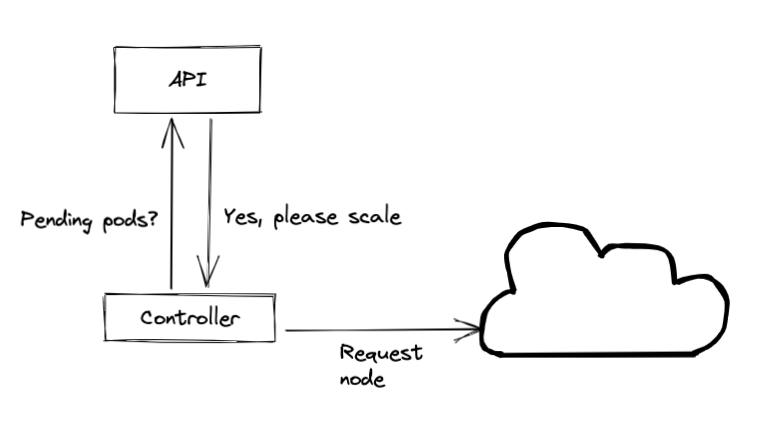
- Are there any “pending” pods that could not be scheduled on the cluster due to insufficient resources available on the nodes? → Scale up
- Are there nodes in the cluster that have been underutilized for an extended period of time and their pods can be relocated to other nodes? → Scale down
The cluster autoscaler is based on a controller, which communicates with both the Kubernetes API and the API of the underlying Cloud Provider to request (or remove) nodes from the cluster whenever necessary.

The methods above (Cluster autoscaling, HPA & VPA) are all examples of resource based reactive scaling, which means you always have a delay between receiving extra load and scaling your infrastructure. But what if your load is not directly related to CPU or memory load? Or peaks so short, a delay like that would remove the need for scaling altogether. Scaling on events may offer a solution here, also known as event driven autoscaling.
Event Driven Autoscaling
Event Driven Autoscaling allows you to respond on almost any metric, the possibilities are practically endless. Examples can be queue lengths, database activity or a count of HTTP response codes.
By scaling based on events, you’re able to instantaneously react to changes in activity, without the latency caused by measuring CPU and/or memory activity of a given time window.
Additionally, event driven auto scaling allows for scaling to zero, which comes down to: no load = no pods. Although this is not suitable for all workloads, when properly configured it can help save on resources tremendously.
A great example of event driven autoscaling is KEDA, which is installed as an operator within your cluster to provide a few CRD’s to allow for scaling on events. When scaling on events, you need a source to get metrics from. These are called Scalers, and there are heaps of options, including but not limited to the ones mentioned below:
- ActiveMQ
- Kafka
- AWS SQS
- PostgreSQL
- HTTP
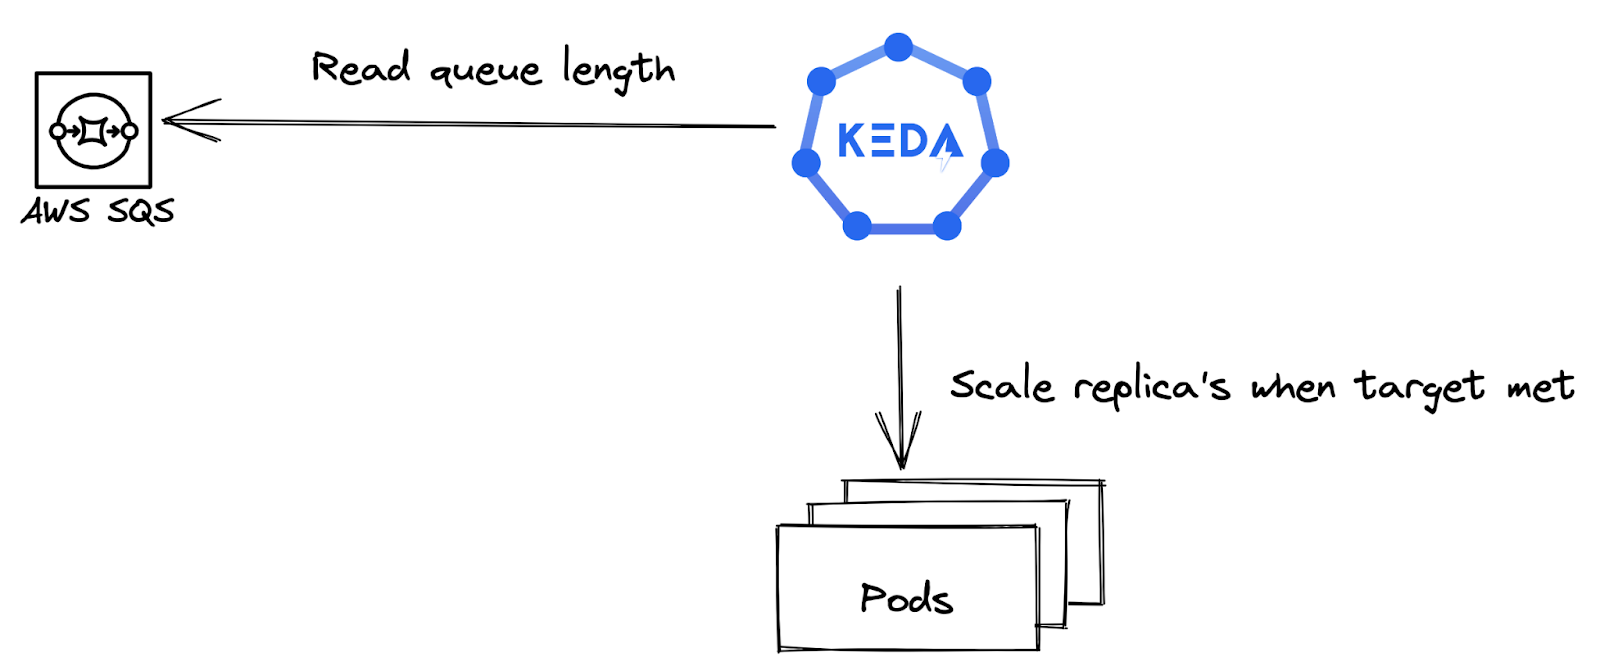
The Scaler can be configured when to trigger based on the specification. Take the AWS SQS queue scaler for example, in essence this only requires two arguments to function properly:
- queueURL: Rather straightforward, the URL of the SQS queue
- queueLength: The amount of messages a single pod can handle. For example: Set the queue length target to 10 if one pod can process 10 messages. If the number of messages in the SQS Queue is 30, the scaler will scale to three pods.
Of course more fine grained controls are available to fit your needs, but even a basic setup could allow for very cool features like scaling to zero and increasing replica’s when the queue is packed with messages.
Greatly simplified view of KEDA’s functionality
Conclusion
Whether you want to scale on increased CPU/memory load or require more fine-grained autoscaling options, Kubernetes offers it all. Most of the time a simple HPA may be sufficient, especially when resources are configured properly with the help of the VPA recommender. But whenever your load tends to be a bit more unpredictable in terms of regular compute power or may be based on processing jobs, a product like KEDA could make a massive difference for your infrastructure. Do you already implement autoscaling in your projects? What are other benefits of autoscaling you've found?